We leapfrogged 1.1.6 because we got a ton of requests. So here is InTime version 1.1.7. What are the top 3 features worth checking out? Here's my list.
For a detailed list of changes, please see the release notes.
#1 - "The Good, The Bad and the Necessary" -- More control over synthesis and place-&-route
We get these questions very often -
1) "How do I lock a certain setting? I'll bet my last penny that it's vital for my design"; or
2) "This tool setting gave us problems in the previous design, so I don't want to touch it"; or
3) "Can I just run seed 1, 3, 5, 7...? Only primes"
In previous versions, we built in Tcl commands for you to manually filter settings. Now, you have a sleek new GUI to do it. Take a look at "Current Projects" -> "Setting Filters"
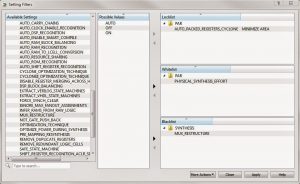
You have 3 categories:
A. Whitelist - "THE GOOD"
InTime will manipulate ONLY the values of these settings. This means that other settings which are not defined in the whitelist will be ignored. This is in order to learn from a more focused range of settings.
B. Blacklist - "THE BAD"
InTime will NEVER change the values of these settings, and keep the defaults or whatever values they are currently set to.
C. Locklist - "THE NECESSARY"
InTime will FIX this setting to the specified value across all builds.
Using this GUI, you can quickly verify your settings' selections and examine all the possible combinations of settings that InTime will learn from. You can also export and import these settings as templates to re-use them.
#2 - Critical Paths Analysis across all builds
Developed in version 1.1.6, this feature helps you understand the design's critical paths better, so as to decide what critical paths to debug. Instead of focusing on just 1 or 2 build results which may flag non-significant timing paths, InTime analyzes across-the-board, showing you the critical paths which happen most of the time.

#3 - What's cooking? New "Effort Level Recipe"

From the chart, the best result with a low placement multiplier effort value of 2.
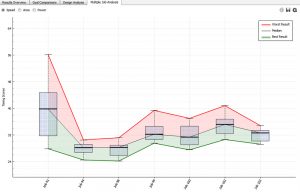
Not limited to placement effort multipliers, the recipe also includes router effort multipliers. The chart shows the results of using the different router effort multipliers for the design. You can do all these easily using InTime, without the hassle of copying files, collating results and planning out all the different iterations. Put all the compute power to good use.